WiseCleaner Think Tank
Encounter difficult computer problems?
All about maintenance and optimization of your Windows System.
Mar 31, 2023
Windows Search is an important feature since Windows Vista more than 10 years ago. It has been always trying to offer users a faster, easier and more accurate search experience. With Windows Search, you can search content on your devices, in the cloud or on the Internet, including but not limited to APPs, Settings, files, OneDrive and Outlook.
Here we introduce how to improve the Search function to get better search results on Windows 11.
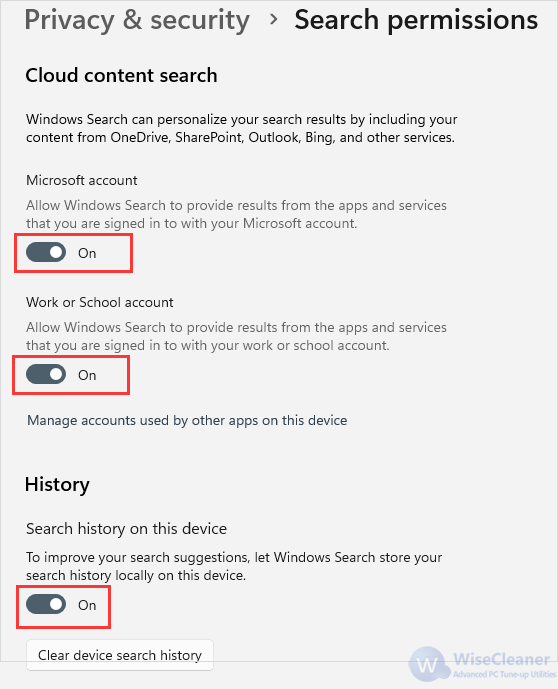
Windows Search takes content from OneDrive, SharePoint, Outlook, Bing and other services to personalize your search results. It also stores your search history locally on your device, in order to help find content faster and improve your search suggestions.
That is to say, if you have searched for an APP before, you are more likely to find it with a high rank in the search results.
Press Windows key + I key on the keyboard to open Windows Settings.
On the left panel, click on the Privacy & security tab.
Under Windows permissions, click on Search permissions.
Here you will see Cloud content search and History. Turn them on by switching Microsoft account, Work or School account and Search history on this device all to On.
When you Search on your computer, Windows builds indexes based on your content. You can also customize the search location to include or exclude a specific folder. All data collected from the index is stored locally on your computer, and will not be sent to any other computers or Microsoft.
Same to the index in a book, this feature allows the computer to find content much more quickly by looking for the terms and properties than without the Indexing. But at the same time, searching the entire PC may affect battery life and CPU consumption.
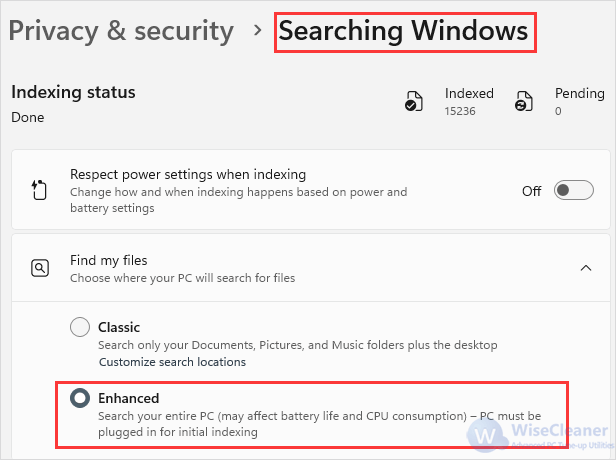
After you turn on the accounts and history, return to the Privacy & security page. Under Search permissions, click Searching Windows.
Switch Find my files option to Enhanced. This will search the entire PC.
App launch tracking allows Windows to track apps that you launch to quickly have access to your list of most-used apps both in the Start menu and when you Search your device.
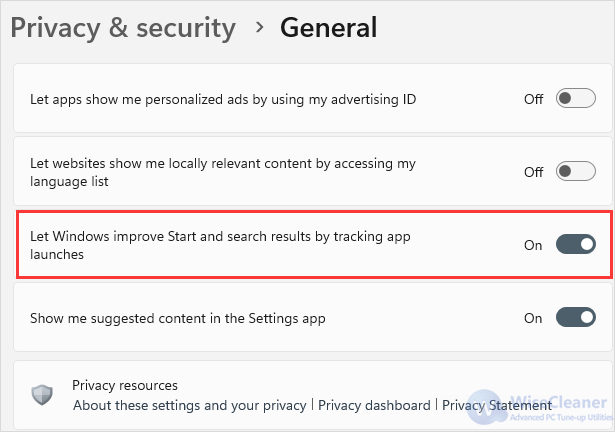
Return back to Privacy & security again, and select General in the first of Windows permissions.
Switch the toggle of Let Windows improve Start and Search results by tracking app launches to On.
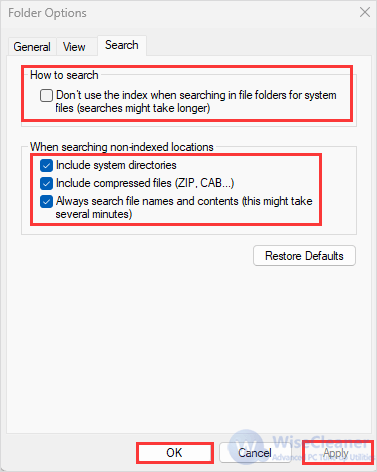
There should be an icon named “This PC” on your desktop. Double-click and open it.
Click on the three horizontal points next to View on the top, and then select Options.
On the window of Folder Options, switch to the third tab, Search.
Make sure the box under How to search is not selected.
Under When searching non-indexed locations, there are three options. Check them by selecting the boxes in front of them. Then click and Apply and OK.
Above is how to improve the function of Windows Search. After you finish the four steps, you will get a better experience in Windows Search on your Windows 11. If you find this helpful, please visit WiseCare Think Tank to get more Windows tips.
Additional Related Articles
wisecleaner uses cookies to improve content and ensure you get the best experience on our website. Continue to browse our website agreeing to our privacy policy.
I Accept


