WiseCleaner Think Tank
Encounter difficult computer problems?
All about maintenance and optimization of your Windows System.
Oct 22, 2023
If you use Windows 10, you might have run into a problem where your standby memory is using up a sizable percentage of your RAM. This issue might cause poor performance, stuttering in games, and an unsatisfactory experience all around. Fortunately, there are approaches to fix standby memory problems and enhance the functionality of your device. We will look at three practical solutions to this issue in this tutorial.
Before diving into the solutions, let us first understand standby memory and why it can be a problem on Windows 10.
A portion of your computer's RAM, called standby memory, is used to store data that the operating system thinks you'll need shortly. Cache files, recently closed apps, and other system-related data are examples of this data. Standby memory is designed to improve system responsiveness by keeping frequently used data accessible.
Windows 10 may occasionally manage standby memory inefficiently, though. Too much data retention can leave you with little available RAM for executing apps. Performance problems may result from this, especially if you use resource-demanding programs or play games.
Simultaneously using several programs, background processes, and drivers frequently causes memory-related issues. Some of these entities can keep their cache in the standby memory area, which would increase standby memory usage.
As a result, there is a notable decrease in the amount of free memory, which causes performance issues and a visible slowdown in the Windows operating system.
The Standby Memory allotment gradually increases as you run more apps because of the buildup of cached data. Apart from this, Windows starts particular tasks that may aid in expanding Standby Memory.
As long as there is still plenty of free memory and your computer's performance is unaffected, there is no reason for concern. Windows is skilled at managing memory allocation effectively, ensuring that your system runs without a hitch.
The standby RAM issue may become evident when running Windows 10 updates, playing games, or using other software programs. Users could occasionally come across error messages like "memory fault" or "the program cannot allocate the necessary RAM." You can follow the below steps to assess whether a Windows 10 standby memory issue is at work:
Step 1: Open the Task Manager by pressing the buttons, Ctrl + Shift + Esc, then select the Performance tab.
Step 2: Select Memory, and tap on the option Open Resource Monitor.
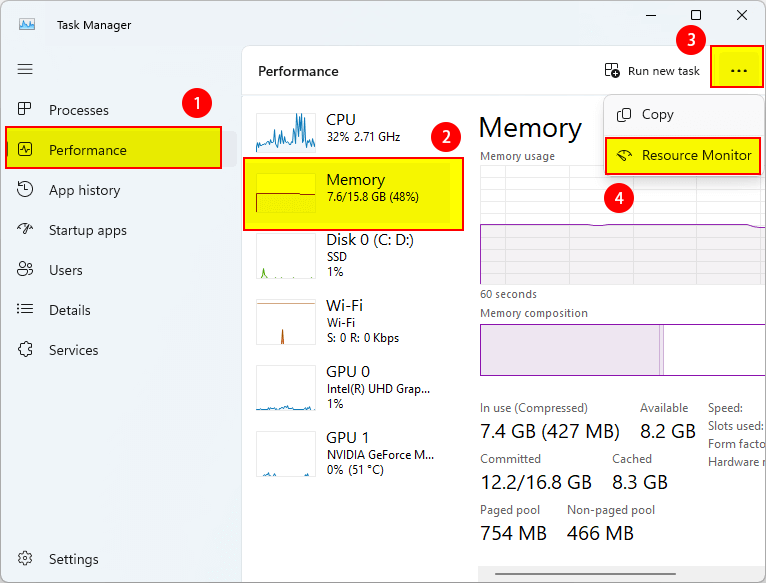
Step 3: Check the Standby Memory usage under Physical Memory, which is indicated in blue.
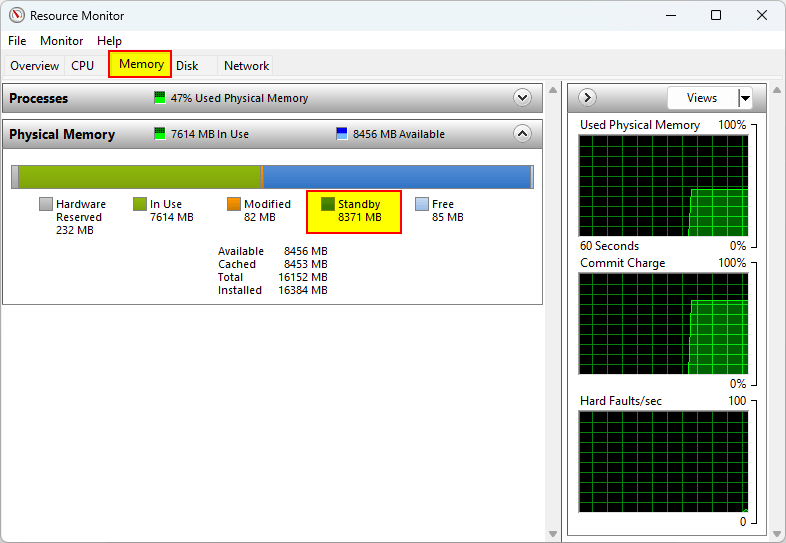
Performance problems could arise if your Standby Memory usage is excessive and your Free Memory usage is very low. The simplest method is to check Standby Memory in the Resource Monitor. You can now move from the analysis stage to the action stage.
Restarting the computer is the simplest fix for a resource shortage, whether caused by high CPU usage or Standby Memory. Your system will get off to a fresh start, and resource usage will return to normal.
Check to see if the problem has been fixed after the PC restarts. If so, the Standby Memory problem was probably an isolated incident. Therefore, you need not be concerned.
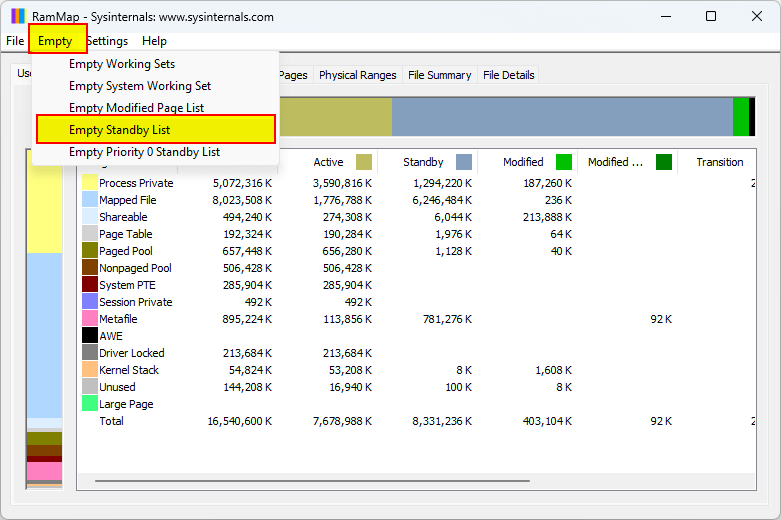
Microsoft's RAMMap is a useful application that enables users to manually erase the Standby Memory. Given that it is available on Microsoft's official website, the tool is frequently chosen as the default option by most people. Here is how to go about it.
Step 1: Visit the official Microsoft website and select the RAMMap utility download link.
Step 2: Now, you have to right-click on the downloaded file and then click on Extract All.
Step 3: Pick the location of your choice, and then select the option Extract.
Step 4: Run the RAMMap utility after opening the extracted files.
Step 5: Then go to the UAC prompt and Click Yes.
Step 6: After this, click Agree to accept the license terms.
Step 7: Go to the Empty option in the menu, click on it, and select Empty Standby List to free the Standby Memory.
Step 8: Finally, click File and select Refresh to see how the memory allocation stands now.
You can easily create a task with EmptyStandbyList, after which Windows will take care of clearing the Standby Memory at regular intervals, usually every 5 minutes from your selected time. As a result, you will notice a substantial portion of your RAM becoming available as Free Memory. Here are the steps to follow:
Step 1: Download it by going to the EmptyStandbyList website. This command line removes all data from standby memory.
Step 2: Next, perform a right-click on the downloaded file and proceed to choose the "Properties" option.
Step 3: To save the changes, select Run this program as an administrator on the Compatibility tab and click OK.
Step 4: To access the Search menu, press buttons Windows + S, type Task Scheduler, and then select the appropriate search result.
Step 5: Now click on Create Task on the right.
Step 6: Under Security settings, select Change User or Group after giving the job a name.
Step 7: Next, tap on the Advanced button.
Step 8: Select the Find Now option and double-click System from the list that appears.
Step 9: Select OK.
Step 10: Go to the Triggers tab and choose the Run with the highest privileges and Hidden checks.
Step 11: Click on New.
Step 12: From the drop-down box under "Begin the task," select "On a schedule," check "One time," and then select a start time.
Step 13: Click OK after setting the Repeat task to 5 minutes and the Duration to Indefinite.
Step 14: Then, move over to the Actions tab and click New.
Step 15: From the Actions drop-down menu, select Start a program, then click Browse.
Step 16: Locate and choose the EmptyStandbyList.exe file, then click Open.
Step 17: To create the task, click OK here and on all subsequent windows.
Use the Wise Memory Optimizer, a sophisticated and free memory enhancement software, and the top Windows memory optimizer and cleaner. With this tool, you are just a click away from defragment, emptying standby memory, and freeing up memory with a single click.
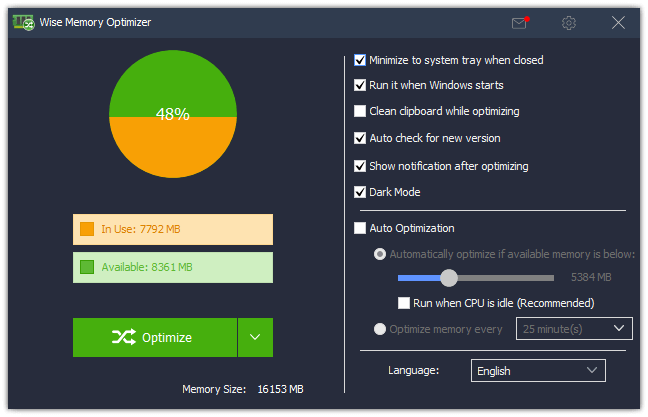
1. You can optimize your computer's physical memory and boost its performance by releasing memory occupied by unnecessary applications, thus enhancing system performance, defragmenting memory to improve overall system responsiveness and speed, and clearing the Standby memory (cached memory) to increase the available Free memory for efficient system operation.
2. Wise Memory Optimizer offers a user-friendly interface that conveniently displays critical memory statistics such as In Use, Available, and Total Memory through an intuitive pie chart. With just a single click on the "Optimize Now" button, the program rapidly frees up memory, making it suitable for both novice and experienced users.
3. This tool features an automatic optimization mode that activates when available PC memory falls below a user-defined threshold. Wise Memory Optimizer can operate during idle CPU periods and allows users to customize the amount of memory they wish to release, ensuring efficient background memory optimization.
4. The application boasts minimal CPU and system memory usage, delivers prompt optimization results, and offers a portable version. The portable version allows you to run the program directly from your hard drive or a flash drive, eliminating the need for installation.
5. Wise Memory Optimizer is a free tool available for download, providing users with free automatic updates and email-based technical support. It is entirely compatible with a broad range of Windows operating systems, including Windows 11, Windows 10, and both 64-bit and 32-bit versions, starting from Windows XP onwards.
Standby RAM will be used to cache disk access, previously used files, and files or software you could be likely to access while it is not being used by any apps. The system is sped up by doing this. The standby memory will be made available to an app as soon as it makes a memory request.
The best way to disable Sleep mode in Windows 10 is as follows:
Navigate to Settings > System > Power & Sleep on a Windows 10 computer to disable sleep mode. Then, choose Never from the drop-down option next to Sleep. Do this for battery mode on your laptop as well.
Go to Start, click Settings > System > Power & Sleep, and then modify the power and sleep settings in Windows 10.
Dealing with standby memory issues on Windows 10 is essential to maintain optimal system performance. These issues, often associated with sluggishness and performance hiccups, can be effectively addressed using the three methods outlined in this guide. By employing tools like RAMMap EmptyStandbyList and adjusting power settings, you can take control of your system's standby memory and ensure that your Windows 10 experience remains smooth and responsive.
Additional Related Articles
wisecleaner uses cookies to improve content and ensure you get the best experience on our website. Continue to browse our website agreeing to our privacy policy.
I Accept


