WiseCleaner Think Tank
Encounter difficult computer problems?
All about maintenance and optimization of your Windows System.
Feb 1, 2018
For improving Windows 10 enterprise security, Microsoft turned on PUA/PUP protection of Windows Defender by default. But, it has been turned off by default in Windows 10 Home and Windows 10 Pro. What is PUA/PUP? How to turn on Windows Defender PUA/PUP protection in Windows 10 Home and Windows 10 Pro?
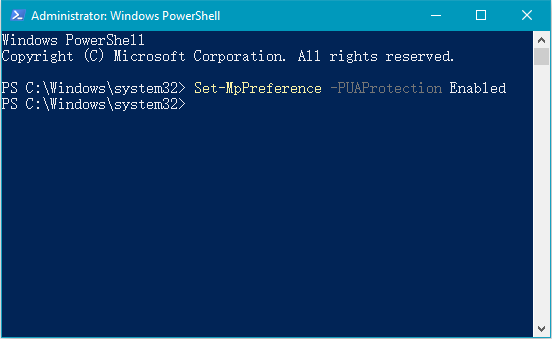
1, Press Win + S keys on the keyboard.
2, Type powershell in the search window.
3, Right-click on Windows PowerShell, and click Run as administrator.
4, Enter the following command:
Set-MpPreference -PUAProtection enabled
5, Restart the system, and then the PUA detection will be enabled.
Tip:
Before starting to edit the Windows registry, please make a full registry backup. You can refer to this page to learn How to back up a full Windows registry.
1, Press Win + R to open the Run window.
2, Type regedit, and press Enter or click the OK button to open Registry Editor.
3, Expand and find the following registry key.
HKEY_LOCAL_MACHINE\Software\Policies\Microsoft\Windows Defender
4, Right-click on Windows Defender, select New and click Key, and then named MpEngine.
5, Click on MpEngine, then right-click on the right area, select New, and click DWORD (32-bit) Value, then named MpEnablePus.

6, Double click MpEnablePus, set its Value data = 1
7, Restart the system, then the PUA protection will be enabled.
Tip: If you want to disable PUA detection, just change the MpEnablePus value to 0, or delete the registry key MpEngine.
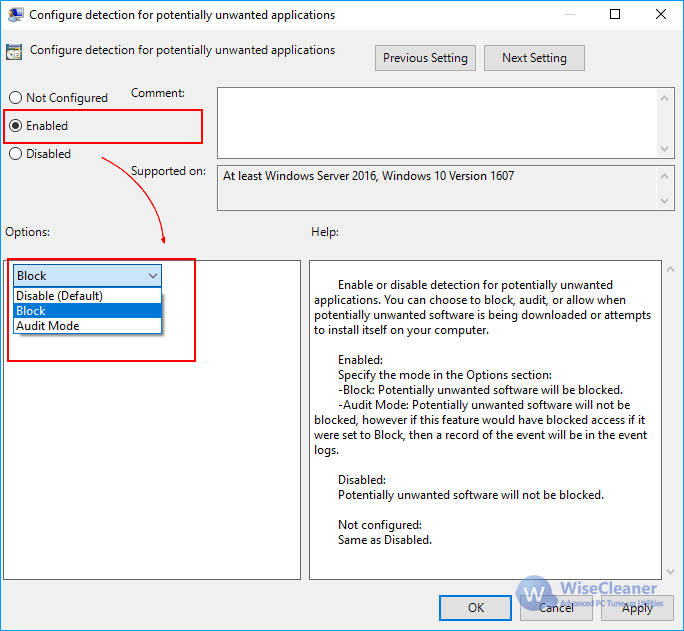
1, Press Win +R to open the Run box.
2, Type gpedit.msc in the Run box and click OK.
3, In the Group Policy Management Editor, go to Computer configuration and select Administrative templates.
4, Expand the tree to Windows components > Windows Defender Antivirus.
5, Double-click Configure protection for potentially unwanted applications.

6, Select Enabled to enable PUA protection.
7, In Options, select Block to block potentially unwanted applications, or select Audit Mode to test how the setting will work in your environment. Select OK.
Before starting the test, please update Windows Defender to the latest version. Then follow the steps.
1, Go to http://www.amtso.org/feature-settings-check-potentially-unwanted-applications/
2, Click Launch The Test button to download the test file.
3, After downloading the file, it is automatically blocked and prevented from running.
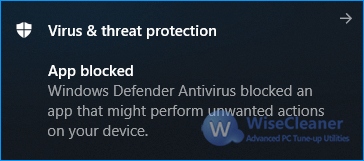
If you are able to download this file successfully, your anti-malware solution is NOT configured correctly to detect Potentially Unwanted Applications, or DOES NOT conform to industry best practices.
1. PUA - Microsoft Defender Testground
2. Block potentially unwanted applications with Windows Defender Antivirus - Windows security
Additional Related Articles
wisecleaner uses cookies to improve content and ensure you get the best experience on our website. Continue to browse our website agreeing to our privacy policy.
I Accept


