WiseCleaner Think Tank
Encounter difficult computer problems?
All about maintenance and optimization of your Windows System.
May 12, 2025
File extensions are essential to Windows 11, as they help your computer determine which program should open a particular file. For example, .txt files open in Notepad, while .jpg files open in Photos. Occasionally, you might need to change a file extension, such as renaming a .txt file to .html. Here's a step-by-step guide on how to change file extensions directly in Windows 11.
File Explorer lets you browse and manage files on your system. You can change the file extension through it by following this:
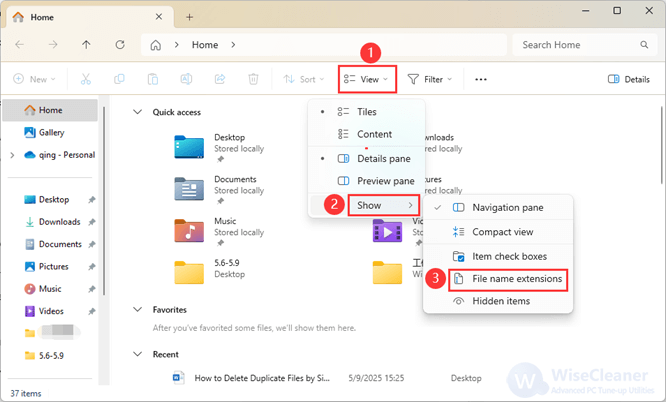
Press Win + E to open File Explorer.
Click the View tab at the top of the File Explorer window. Then, select Show and click File name extensions from the dropdown menu. This action will make the extensions (like .txt, .jpg, etc.) visible after file names, allowing you to edit them directly.
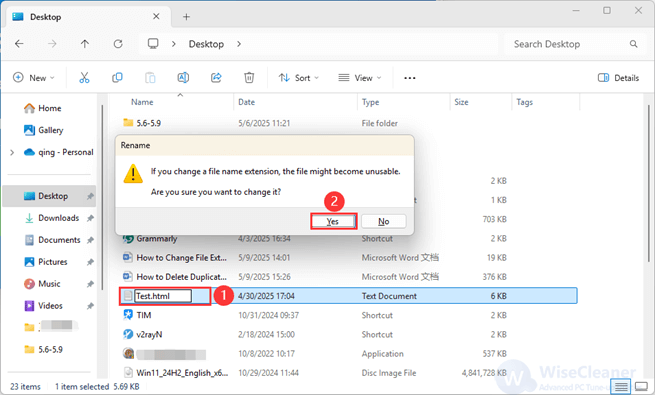
Navigate to the file whose extension you want to change. We create a test.txt file as a case to clarify in the post. Right-click the file and select Rename, or select the file and press F2 on your keyboard. The file name becomes editable. Edit the section after the last period (.) in the file name to your desired extension. For example, change document.txt to document.html.
Then press Enter to confirm. You will see a warning: If you change a file name extension, the file might become unusable. Click Yes to finish.
If you need to change the extensions of multiple files, you can use the Windows Command Prompt.
1. Press Win + S to open the Search bar, then type cmd and press Enter. Select Run as administrator to open.
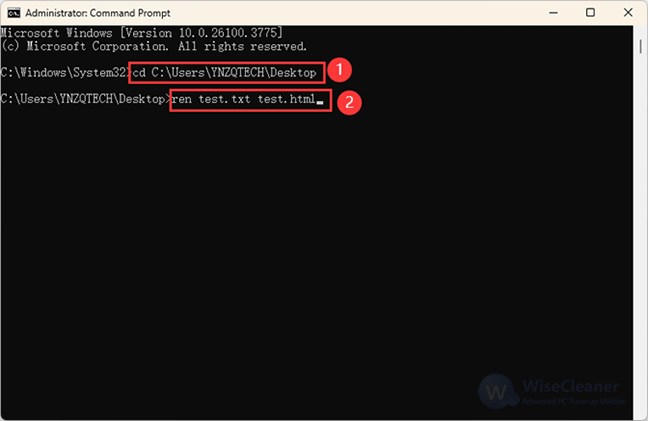
2. Use the cd command to navigate to your file's folder.
cd C:UsersYNZQTECHDesktop
3. Run the following command that changes the extension from .txt to .html:
ren oldfilename.txt oldfilename.html
In our case, the command should be: ren test.txt test.html
4. For batch changes, you can use the command below:
ren *.txt *.html
5. Close the Command Prompt when finished. Check your folder to confirm the extensions have changed.
Windows PowerShell provides advanced scripting capabilities for modifying file extensions. You can make it by following the steps below.
1. Press Win + X, and select Windows Terminal or Windows PowerShell to open it.
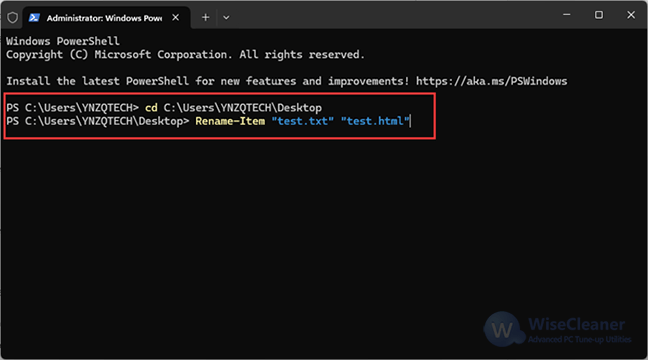
2. Navigate to the directory containing your files using the cd command mentioned in Method
3. You can use the following script to rename a single file:
Rename-Item "oldfilename.txt" "oldfilename.html"
In our case, the command would be like this:
Rename-Item "test.txt" "test.html"
4. For multiple files, use this command:
Get-ChildItem *.txt | Rename-Item -NewName { $_.Name -replace '.txt','.html' }
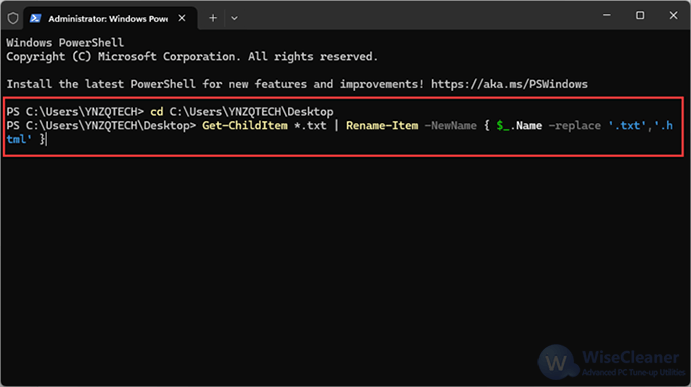
This script will find all .txt files and change their extensions to .html. You can verify the effect in File Explorer.
Changing file extensions in Windows 11 is straightforward. Always proceed with caution, as altering file extensions does not convert file formats—doing so incorrectly may prevent files from opening. If you need to truly convert file formats, use appropriate software tools.
wisecleaner uses cookies to improve content and ensure you get the best experience on our website. Continue to browse our website agreeing to our privacy policy.
I Accept


