WiseCleaner Think Tank
Encounter difficult computer problems?
All about maintenance and optimization of your Windows System.
Feb 4, 2024
It is always a good idea to remove unnecessary old files to save more space for useful data. If you are someone who often forgets to delete old files or does not know how to remove them, the integrated features to auto-delete old files on Windows 11 will meet your needs. We will mainly introduce from 3 ways as below.
The Storage Sense function in system settings can erase old files automatically. This capability allows you to set up automatic file deletion based on various criteria and intervals.
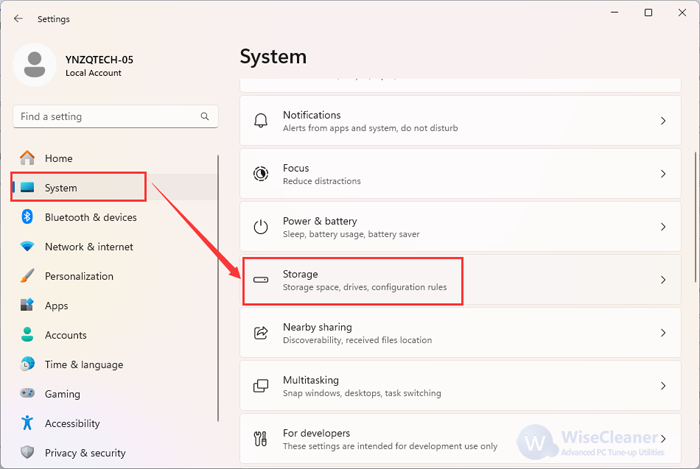
1. Press Win + I to open Settings
2. Click on System on the left panel, and select Storage on the right panel
3. Scroll down to find the Storage Sense to turn it on, and click it to get in
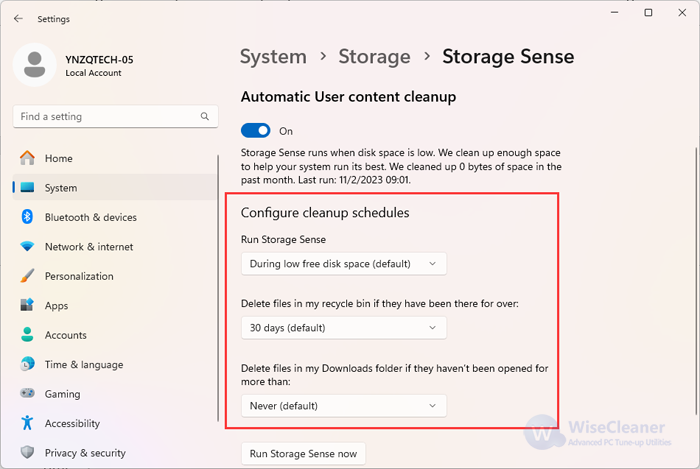
4. Customize the settings. In the Configure cleanup schedules part, select one desired time frame for the Run Storage Sense option including running Storage Sense every day, every week, every month, or automatically during low free disk space (default).
5. Set a length of time under the next option: Delete files in my recycle bin if they have been there for over. So that those old files in the Recycle Bin will be cleared once they stay there beyond the time.
You can also decide to whether delete files within your download folder. The same principle is to set a certain time to clean as step 5. Once everything is configured, click the Run Storage Sense Now button to activate the settings.
Like most operations on Windows, you can make it from the Command Prompt as well. It works with simple text-based commands to help you perform various admin functions and fix lots of troubleshooting issues on the Windows system.
1. Press Win + S to open the search box, and type cmd in the box to search
2. Select the Run as administrator option to open
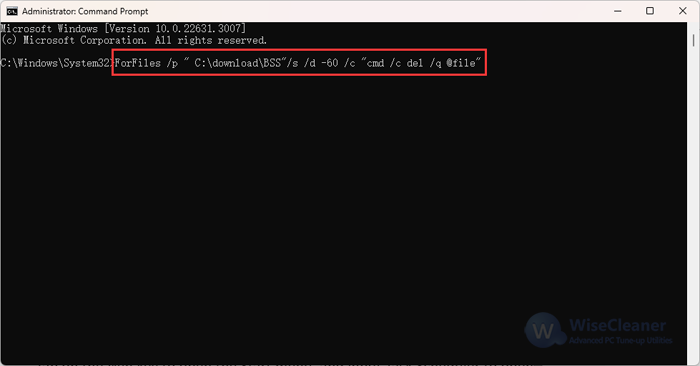
3. For deleting those files that you haven't modified within 30 days, type in the following command and hit the Enter key:
ForFiles /p "C:\path\to\folder"/s /d -30 /c "cmd /c del /q @file"
Please note: The "C:\path\to\folder" and /d -30 here refer to the folder path from where you want to delete files and the specific time for which you'd like to delete your file respectively. You can replace them with the settings that you want. For instance, if we want to delete the BSS folder when it stayed for more than 60 days, then the command will be like this:
ForFiles /p " C:\download\BSS"/s /d -60 /c "cmd /c del /q @file"
As a simple Windows tool, Task Scheduler allows you to easily automate repetitive Windows tasks. That means once you set up a task, the app will handle whatever you have asked it to do. When it comes to auto-deleting your obsolete files, it can work as well.
Tap on the Win key to open the Start menu, and input Task Scheduler to open
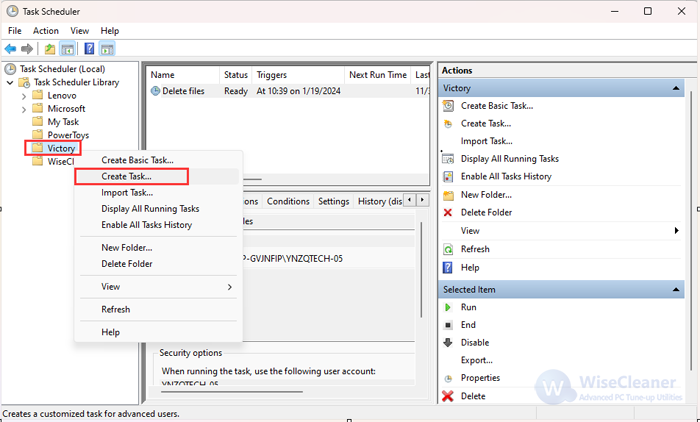
Right-click the Task Scheduler Library item to select New Folder, enter any name you like, and click OK to save. Here we name it Victory.
Now click the Task Scheduler Library in the left pane to expand the list of folders. Next, right-click on the newly created folder and select the Create Task option.
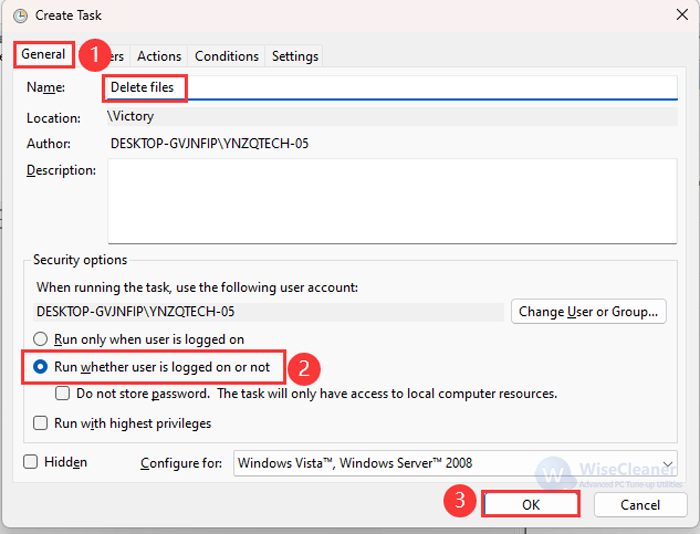
In the General tab, type a name for the task. Next, in the Security Choices section, check the Run whether the user is logged on or not an option. Also, ensure that the Do not store password item is not selected at the moment.
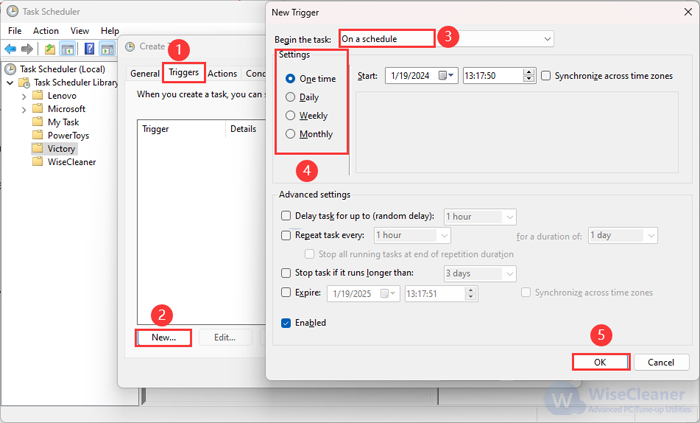
Switch to the trigger tab, click the New button, and choose the On a Schedule option from the Begin the task drop-down menu. Also, you need to set up the timings of the tasks you'd like to run in the Settings section. Finally, click on OK.
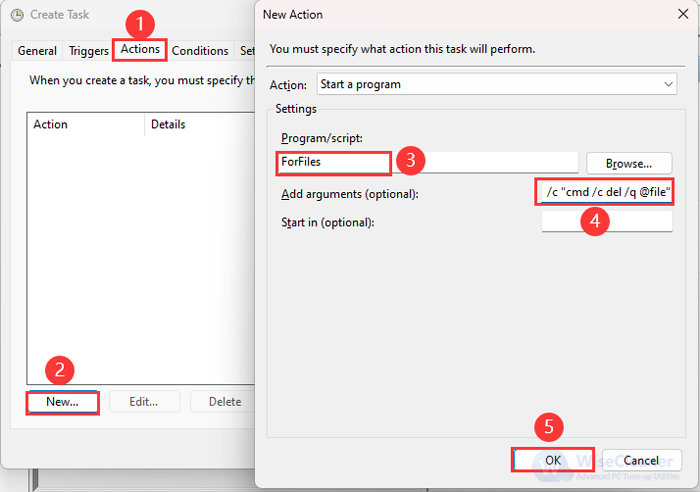
Head to the Actions tab and tap on the New button. From the Actions drop-down menu, select the Start a program option. In the Program/script box, type in the following command: ForFiles
Then, type in the following command in the Add arguments box:
/p "C:\path\to\folder"/s /d -30 /c "cmd /c del /q @file"
Similarly, tweak the above command as mentioned in the second method. Then click OK to go on.
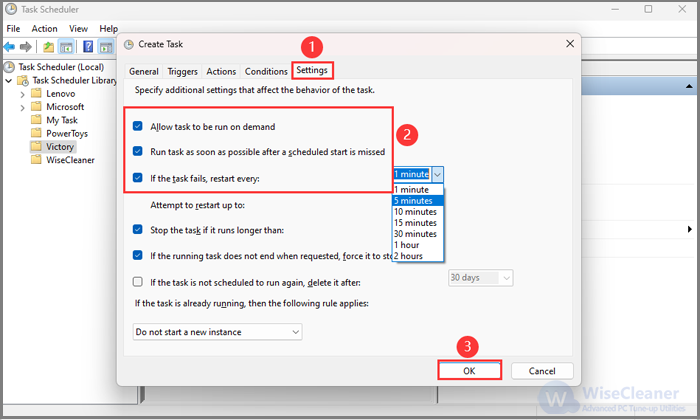
In the Settings tab, check the below options respectively and click OK to finish the configuration:
Once you have set up such a task, the Task Scheduler will automatically delete files in the specified location within the defined time. To stop automatic deletion, you just need to delete the created task directly.
Removing unnecessary files on your computer could be very useful since they occupy memory space and hamper your PC's performance. Setting up auto-delete instructions, with whichever method you prefer, lets you rid your PC of this useless baggage.
Additional Related Articles
wisecleaner uses cookies to improve content and ensure you get the best experience on our website. Continue to browse our website agreeing to our privacy policy.
I Accept


