WiseCleaner Think Tank
Encounter difficult computer problems?
All about maintenance and optimization of your Windows System.
Aug 16, 2021
When we try to install Windows 11 or run the Microsoft PC Health Check, or other third-party tools to check whether the current computer can run Windows 11, we may get such a result, "This PC cannot run Windows 11. The PC must support Secure Boot." What is Secure Boot? How do I fix the problem of "The PC must support Secure Boot"?

UEFI has a firmware verification process (called "Secure Boot"), which is defined in chapter 27 of UEFI Specification Version 2.3.1 Errata C. Secure boot defines how the platform firmware manages security certificates, how to perform firmware verification, and defines the interface (protocol) between the firmware and the operating system. To put it plainly is to verify the hardware through the onboard TPM chip, and then start.
Please click here to learn more about What is UEFI.
If you want to newly install Windows 11 operating system (not to upgrade from Windows 10 through the Insider Program), then the secure boot needs to be turned on, otherwise, the prompt "This computer must support secure boot" will appear.
If your computer is running Windows 7, the Safe Boot should be disabled.
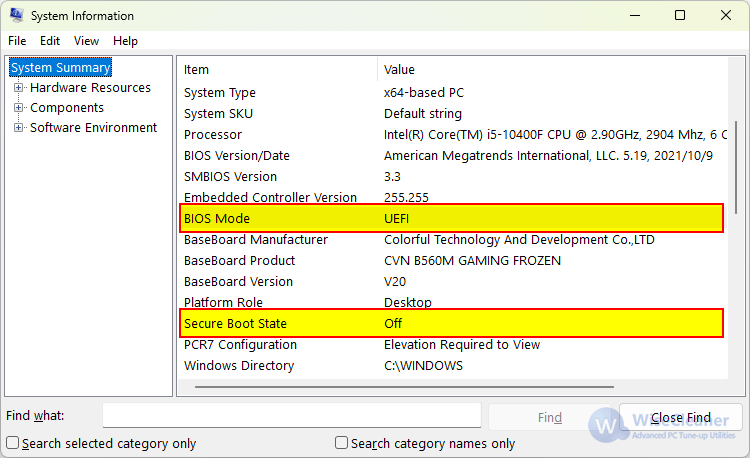
Knowing the Secure Boot status on Windows desktops and laptops is as simple as running the command msinfo32.
1. Open the Run window by pressing the Windows logo key + R on your keyboard.
2. Type msinfo32 and press Enter or click the OK button.

3. In the System Information window that opens, select System Summary on the left.
4. On the right side of the window, find BIOS Mode and Secure Boot State. If the BIOS Mode shows UEFI and the Secure Boot Status shows Off, it means that Secure Boot is disabled on your computer.
We can enable the Secure Boot in the BIOS settings of the motherboard. For different brands of motherboards and computers, the way to activate the Secure Boot is slightly different. We will show how to turn on the Secure Boot of MSI, ASUS motherboards, and Lenovo, Dell, and HP notebooks. If your motherboard or computer is of other brands, please refer to the motherboard manual, or contact the motherboard manufacturer, or search through Google or Bing.
Computers of any brand and motherboard can refer to the following steps to enable secure boot. Here we take Windows 11 system as an example.
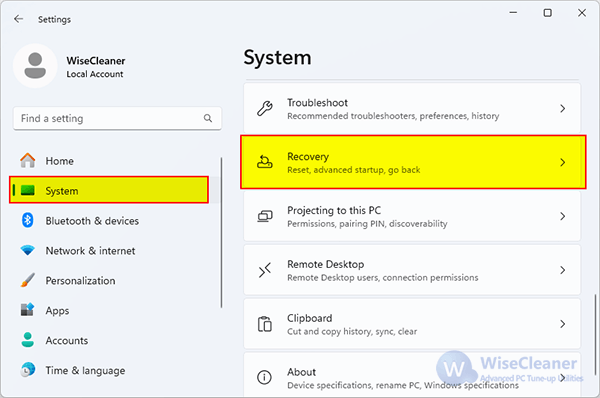
1. Open Windows Settings by pressing Windows + i keys on the keyboard.
2. On the left side of the Settings window, select System. Then select Recovery on the right.
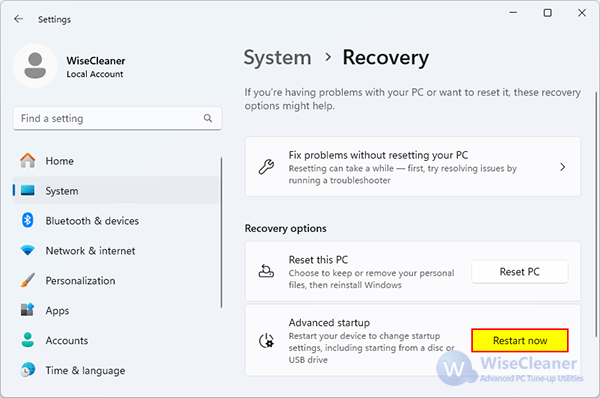
3. Find Advanced Startup under Recovery Options and click Restart Now. Then select Restart now to confirm.
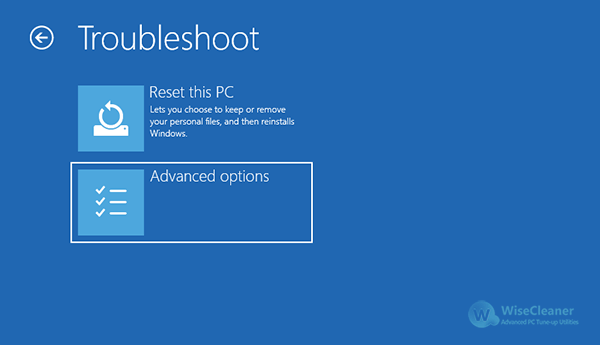
4. Your computer will restart immediately, then select Troubleshoot.
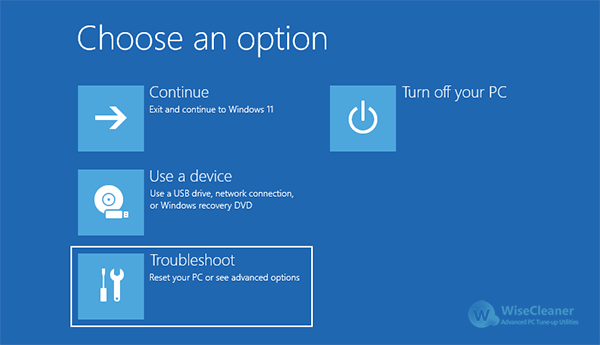
5. Select Advanced options.
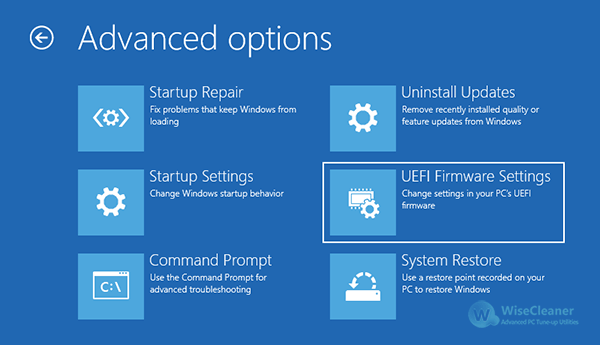
6. Select UEFI Firmware Settings.
6. Click Restart.
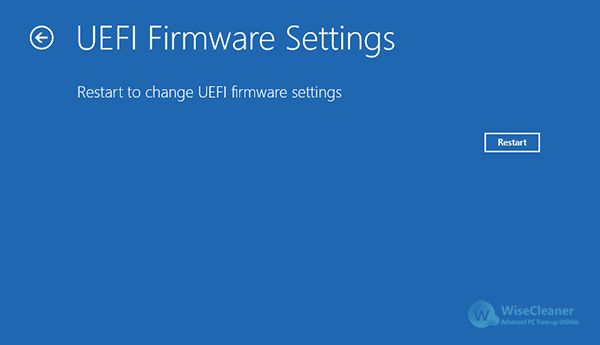
7. Your computer will restart again and automatically enter the BIOS (UEFI) interface. In the Security tab, go to Secure Boot and select Change configuration.
1. Press the power button to turn on the computer, and then immediately press the Delete key or F2 continuously until you enter the BIOS setup.
2. Select Settings, then select Security
3. Change Secure Boot to Enabled
4. Press F10 to save the settings, and then restart the system.
For earlier models, the location of the Secure Boot will be slightly different, it may be in Advanced - Windows OS Configuration - Secure Boot - Secure Boot - Enable.
1. Before the laptop power on, press and hold the F2 button, then click the power button. (Do not release the F2 button until the BIOS screen display.)
2. go to the Advanced Mode by using Hot Key F7
3. Select Security, then select Secure Boot
4. Select Secure Boot, then select Enabled
5. Save & Exit Setup
1. Press the power button to turn on the computer, and then immediately press F2 or Fn+F2 to enter the BIOS.
2. Select Security - Secure Boot, then select Enabled
3. Save changes and Exit
If it is a Think brand (ThinkPad, ThinkStation, ThinkCentre), please click the link below. https://support.lenovo.com/us/en/solutions/ht509044/
1. Press the power button to turn on the computer, and then immediately press F2 or F12 to enter BIOS.
2. Select Boot - Secure Boot, then select Enabled
3. Press F10 to save and exit
1. Press the power button to turn on the computer, and then immediately press the Esc key repeatedly until the Startup Menu opens.
2. Select the option BIOS Setup (F10)
3. Then select Advanced – Secure Boot Configuration
4. Click Configure Legacy Support and Secure Boot,then select Legacy Support Disable and Secure Boot Enable.
5. Save Changes and Exit
MSI Blog: How to check if your system is available for Windows 11
ASUS FAQ: Error message "Secure Boot Violation" appears in BIOS
wisecleaner uses cookies to improve content and ensure you get the best experience on our website. Continue to browse our website agreeing to our privacy policy.
I Accept


