WiseCleaner Think Tank
Encounter difficult computer problems?
All about maintenance and optimization of your Windows System.
Apr 22, 2020
The icons that Windows uses for your documents and programs are saved in the icon cache, so you can display them quickly without having to load them slowly every time. If there are problems with the icons on your computer, rebuilding the icon cache may help.
Sometimes, if the icon cache is outdated, the icon may be displayed incorrectly or even lost. For example, when you upgrade an application, this new version comes with a new icon, but the old icon is still displayed on the desktop. The icons normally displayed before may sometimes be blank or damaged. At this time, we need to rebuild the icon cache to solve the above problems. In this article, we will show you how to rebuild the icon cache in Windows 10 to solve the problem of icon corruption. This guide also applies to Windows 8 and Windows 7.
To rebuild the icon cache, you have to delete all the icon cache files that appear in this folder. It’s not as simple as clicking on them and pressing Delete, though: those files are still in use by Explorer, so you can’t just delete them normally.
Please refer to the following steps, and run the icon cache deletion command.
1. Press Win + s to launch the search window.
2. Type command prompt in the search window.<.p>

3. Right-click on Command Prompt and choose Run as administrator
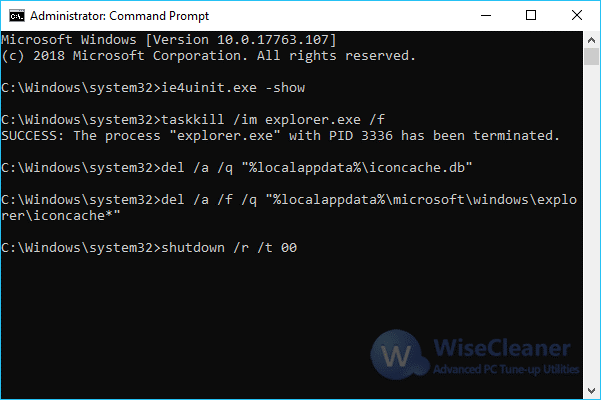
4. Copy and paste the following commands, and press Enter after each command:
ie4uinit.exe -show
taskkill /IM explorer.exe /F
DEL /A /Q "%localappdata%IconCache.db"
DEL /A /F /Q "%localappdata%MicrosoftWindowsExplorericoncache*"
shutdown /r /f /t 00
Additional Related Articles
wisecleaner uses cookies to improve content and ensure you get the best experience on our website. Continue to browse our website agreeing to our privacy policy.
I Accept


