As a default web browser in Windows 11, Microsoft Edge is seemingly unpopular with part of netizens. The reasons behind this could be various and complicated, perhaps people have not gotten rid of the shadow from its predecessor Internet Explorer, or maybe people are more inclined to not be forced to use one specific browser.
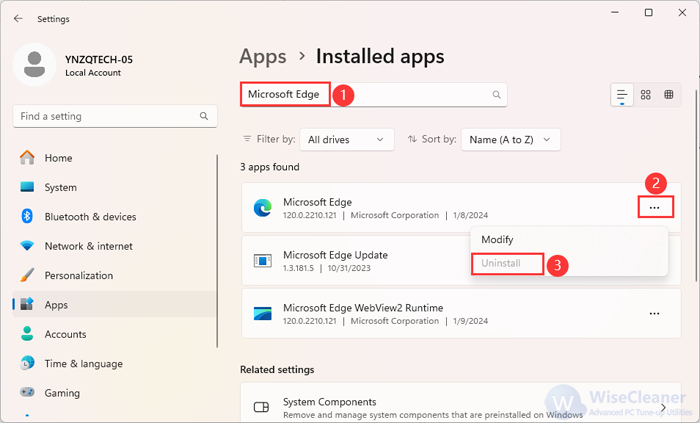
Accordingly, part of people decides to uninstall Edge from their computers, but the process is usually not smooth. Generally, people will navigate to system settings to uninstall it as below: Click on Start> Settings> Apps> Installed apps, search for Microsoft Edge, and expand the three dots to tap the Uninstall option. However, they will also find that the Uninstall button is gray which means this step cannot remove it.
If you are one of these people, follow this article to completely uninstall it. What’s more, we will also tell you how to stop Microsoft Edge from reinstalling on your PC.
There are 3 different methods to uninstall Microsoft Edge from your computer: Command Prompt, PowerShell, and a free third-party tool Wise Program Uninstaller. (Please note that uninstalling Microsoft Edge will remove all its data and settings. So, make sure to back up any important bookmarks or passwords before you proceed.)
Method 1. Remove Edge via Command Prompt
You can uninstall Microsoft Edge by running some specific commands in Command Prompt.
Step 1. Find the version number of Microsoft Edge
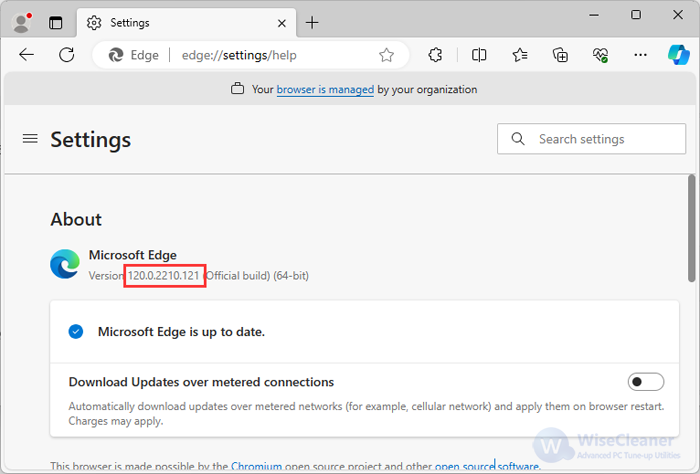
Before running Command Prompt, you need to know the version number of Microsoft Edge on your computer.
Open Microsoft Edge, click on the three dots in the upper-right corner, select Help and feedback, and tap About Microsoft Edge. Then you will see the version number there, and copy it to the clipboard for preparation.
Step 2. Open Command Prompt
Press Win + S to open the search window, type in cmd to search, and click on Run as administrator to open the Command Prompt.
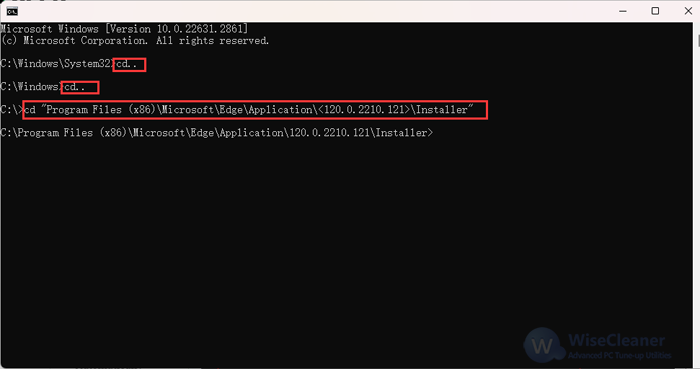
Step 3. Navigate to Edge’s “Installer” directory
Depending on which directory your Command Prompt opens in by default, you may need to run the cd .. command to go back one or two levels. Before executing the following command, you need to replace the Version Number with the actual version number that you just copied.
cd “Program Files (x86)\Microsoft\Edge\Application\
Pressing the Enter key, you will see the concrete directory of Microsoft Edge.
Step 4. Uninstall Microsoft Edge
Keep running the following command to remove Edge:
Setup –uninstall –force-uninstall –system-level
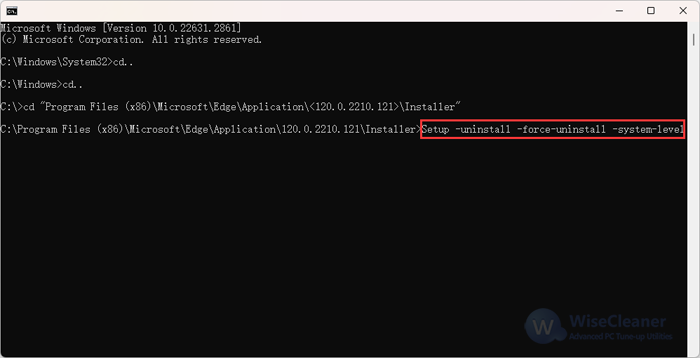
Once you run the above command, Microsoft Edge will be removed from your PC.
Method 2. Uninstall Edge from PowerShell
In addition to Command Prompt, you can also use Windows PowerShell to remove Microsoft Edge. Here is how to make it.
Step 1. Open Windows PowerShell
Press Win + S to open the search window, enter Windows PowerShell to search, then tap Run as administrator to open.
Step 2. Remove Microsoft Edge
Copy and paste the following command, then press the Enter key
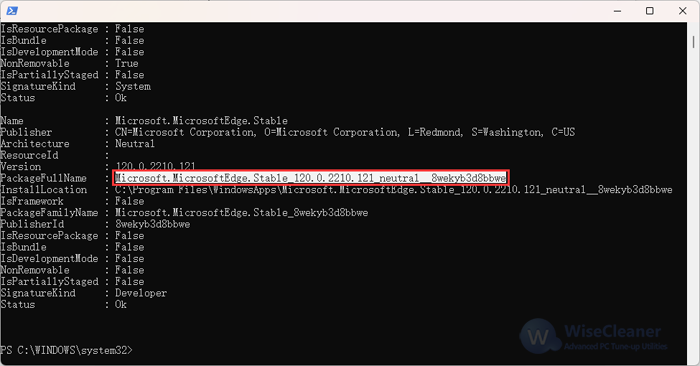
get-appxpackage *edge*
You need to find the PackageFullName item to copy the text behind it.
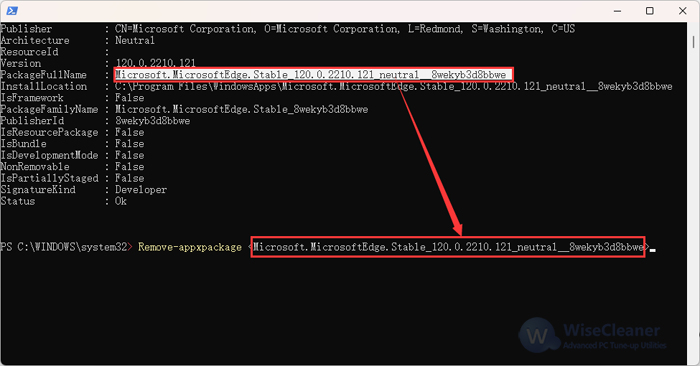
Now you just need to run this command below to uninstall Microsoft Edge. Again, you need to replace the PackageFullName with the text you just copied before running.
Remove-appxpackage
Method 3. Uninstall Edge through Wise Program Uninstaller
Both Command Prompt and Windows PowerShell seem not that easy to completely get rid of Microsoft Edge. Thus, it is necessary to introduce another tiny tool, Wise Program Uninstaller, which is free but highly efficient to remove programs. Beyond Microsoft Edge, Wise Program Uninstaller can also smoothly uninstall third-party apps, other Windows built-in apps, and UWP installed from the Windows Store from your computer.
Step 1. Install Wise Program Uninstaller
If you have not owned this practical tool, click here to get it now.
Step 2. Find Microsoft Edge
After installation, you do not need to register or something. Just click on the All Programs tab, and input Microsoft Edge in the search box. The result will come out for a split second.
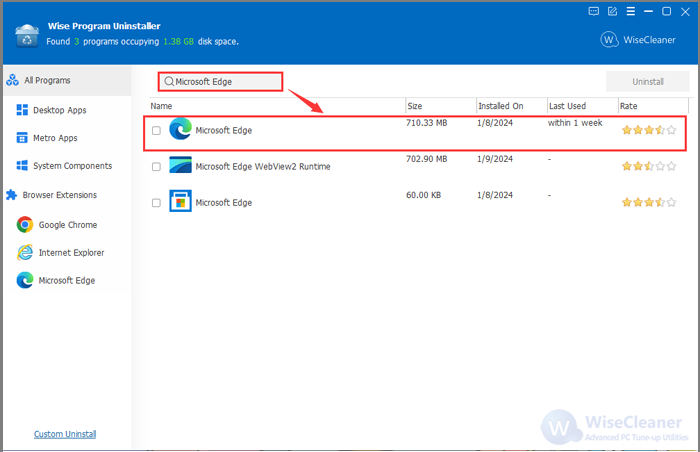
Step 3. Uninstall Microsoft Edge
Checking Microsoft Edge, you can uninstall it directly by clicking the Uninstall button. Besides, click on the Microsoft Edge item, and you will see three options there, Safe Uninstall, Modify, and Force Uninstall. When using Safe Uninstall, Wise Program Uninstaller will call the program's anti-installation program to perform the removal operation, and then scan and clean up the residual items. But in some cases, if the safe uninstall does not work, you can use Force Uninstall to make it.
Prevent Microsoft Edge from reinstalling
After uninstalling, Microsoft may automatically come back by following Windows updates as it is the core part of the Windows system. If you don’t want this to happen, you can do something to get around it.
1. Press Win + R to open the Run dialogue
2. Type regedit in the box and click OK to open the Registry Editor
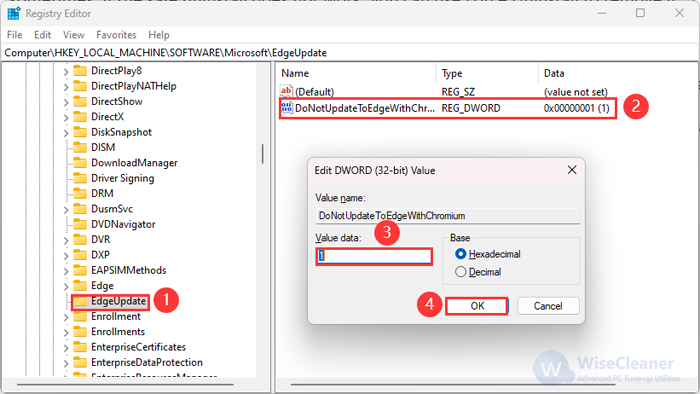
3. Navigate to HKEY_LOCAL_MACHINE > SOFTWARE > Microsoft
4. Right-click on the Microsoft key, select New> Key, and Rename the new key as EdgeUpdate
5. Right-click on the EdgeUpdate key in the right panel and select New > DWORD (32-bit) Value
6. Double-click on it to set the value as 1, then click OK to save
Conclusion:
There are three methods to uninstall Microsoft Edge. By contrast, the third one is that removing Edge through Wise Program Uninstaller will be easier and more valuable because once you install it, you can uninstall not only Microsoft Edge but also other applications on your computer in the future. At the end of the article, we also show you how to stop Microsoft Edge from reinstalling when proceeding with Windows updates. Hoping this post can assist you in using the computer better.